By Nicholas Brown.
- A Primer.
- How To Create A New Ethereum Wallet.
- How To Send Ethereum Tokens.
- How To Receive Ethereum Tokens.
- How To Create A Mobile Ethereum Wallet.
A Primer
Ethereum is a decentralized network of thousands of computers that each store a copy of a distributed ledger. Those computers (Ethereum nodes) synchronize with each other over the Internet and maintain the integrity of the ledger via validation and a consensus algorithm. This distributed ledger contains all of everyone’s Ethereum transactions and is referred to as the Ethereum blockchain.
Ethereum sounds cryptic to almost anyone that is new to it, but that’s because it is different from how conventional financial institutions work — which are complex in their own right. Ethereum is not a corporation, and it is not owned by anyone. This also means that it is not responsible for the loss of funds.
Ethereum is designed to provide you with full autonomy over your funds almost as if they were cash. This means that Ethereum has no inbuilt mechanism for the confiscation of your funds, for the reversal of your transactions, censorship, or to freeze your account.
Your Ethereum wallet is a set of cryptographic keys that enable you to authorize outgoing transactions. One of these is a private key, and it is stored on your computer (or phone if you are using a mobile wallet). You should never give anyone your private key, as it provides full access to your funds — enabling an attacker to steal all of your coins.
Your Ethereum wallet can store a variety of tokens, including ETH — the original Ethereum token. All ETH tokens are stored on the Ethereum blockchain. Your wallet distinguishes your ETH tokens from everyone else’s. Other tokens adhere to one of multiple Ethereum token standards, including but not limited to ERC20 and ERC721.
Whether you are receiving ETH or any of the other ERC* tokens mentioned above, you would send them to the same ETH address you are provided with when you create your wallet. Your Ethereum wallet is something you would access via a wallet app.
There are many wallet apps out there, and most of them work out of the box with your private key or recovery phrase (an important string of words your wallet app should provide you with during wallet creation). You must write down your recovery phrase and store it somewhere safe in case your phone or computer is lost or stolen. If you don’t, you can’t recover your funds.
As is the case with your private key, your recovery phrase can be used to steal your funds if it falls into the wrong hands. Also, MetaMask is a light wallet, which means that it does not download the Ethereum blockchain to your computer. Instead, it uses a wallet API provider to handle that side of things for you.
This is convenient if you don’t have enough disk space, but if you want a full node wallet that gives you more control and enables you to contribute to the Ethereum network, try Mist or Parity. Mist can run a full Ethereum node on your computer so that you won’t have to go through a third-party.
Beware of counterfeit apps in the app stores. They pretend to be known, trusted apps that mimic the logos and interfaces of legitimate ones, and then they steal your tokens. Always review app store listings carefully to ensure that everything checks out. Also go to legitimate app vendors’ websites and follow their app store links to be sure.
How To Create A New Ethereum Wallet
There are browser-based wallets, desktop wallet apps, and website-based (cloud) wallets that you can use, but for this example I will use MetaMask — a known and trusted browser-based wallet for Firefox, Brave, and Chrome. MetaMask will also enable you to interact with apps running on the Ethereum blockchain! (these are called ‘dApps’)
If you want to learn more about Ethereum’s capabilities, read my Ethereum introduction. To install MetaMask, go to metamask.io. and go to the Download page and look for the ‘Install MetaMask for Brave’ or equivalent option for your browser and you’ll be taken to the Chrome or Firefox extension site where you can click ‘Add to browser’.
Click the add button and wait for your browser to ask for confirmation. Note that browser extensions in general (whether or not they are wallets) have the ability to collect a great deal of data because they can see everything that you copy, paste, and type in the browser.
They can also see every website you visit. If you access any financial service on your computer (and even if you don’t), you need to go through your browser extensions first and remove any that you don’t know to be trustworthy.
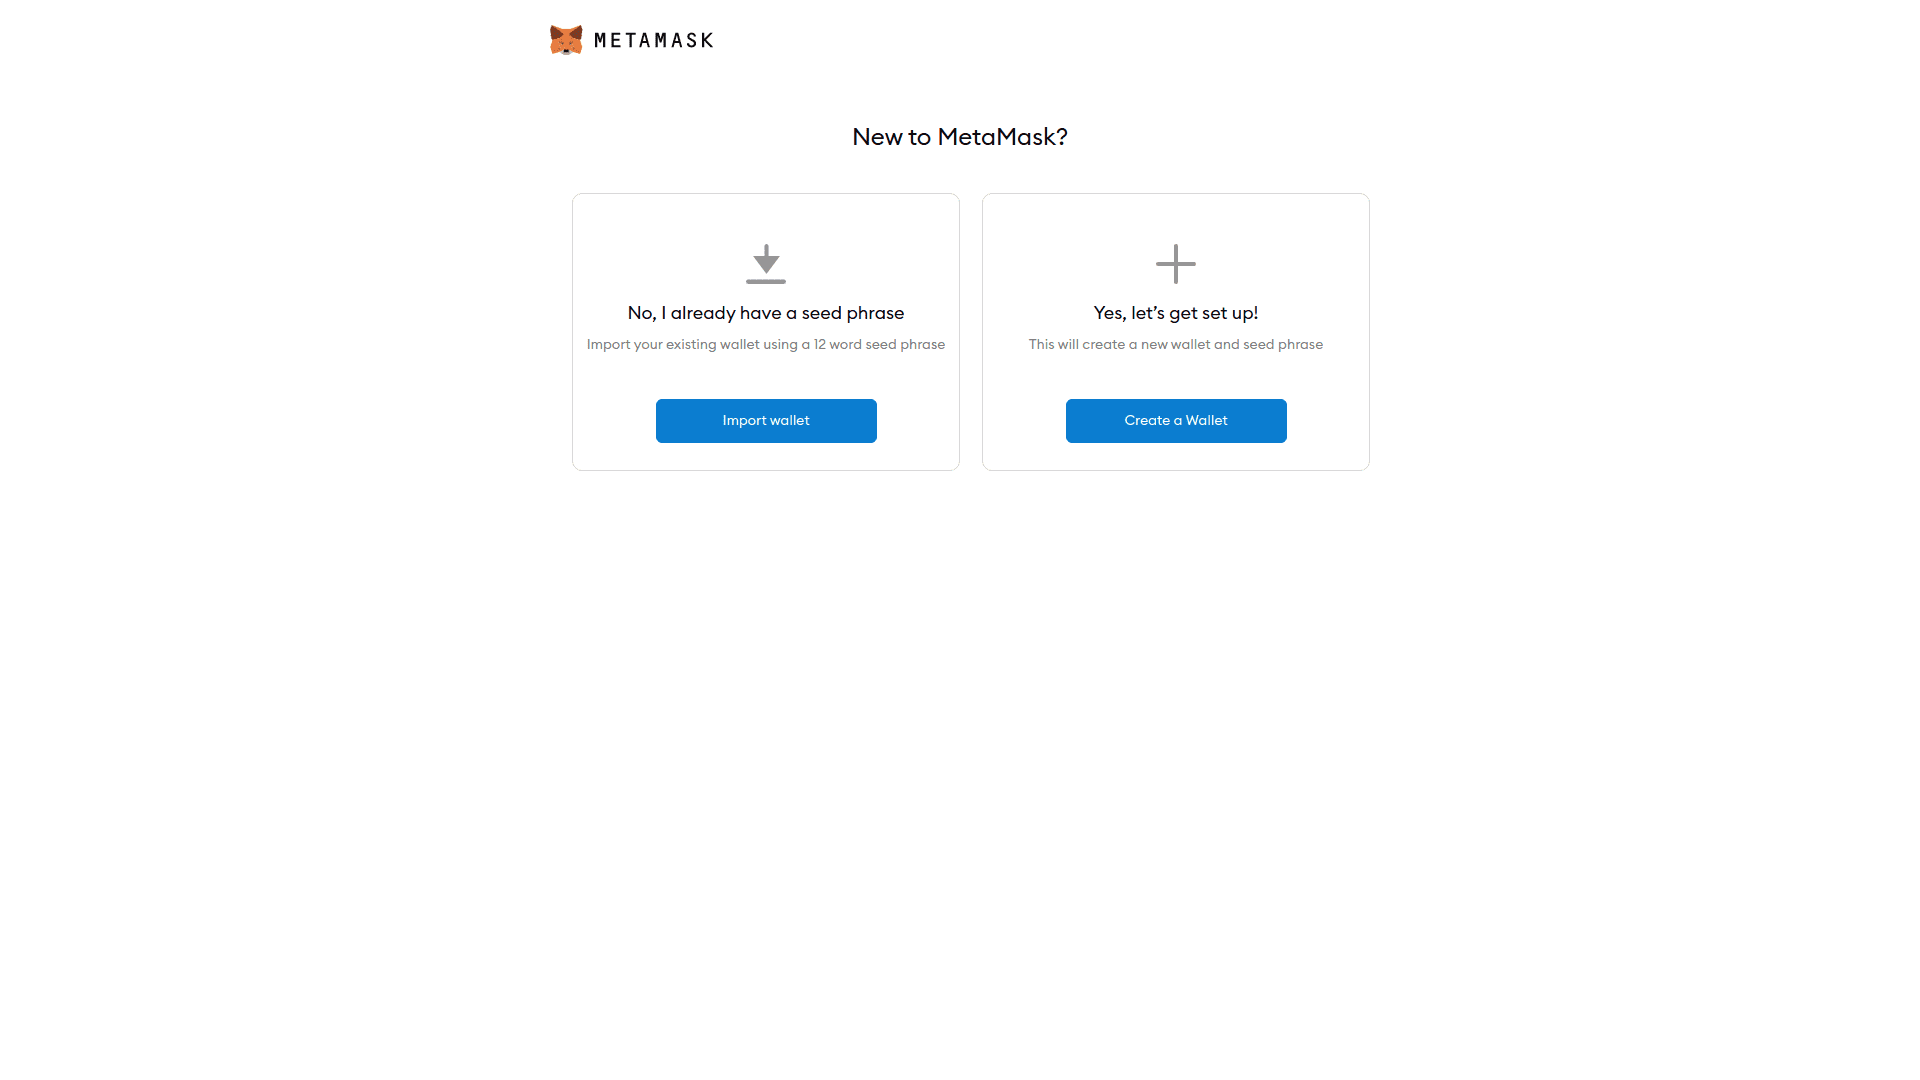
You should now see a MetaMask welcome screen in your browser. It will ask you if you want to set up an existing wallet (the ‘import wallet’ option) or create a new one. Click ‘Create a Walllet’. Read through the privacy prompt and decide if you want to let it collect usage data. You’ll also need to set a password.
Use a strong one! It should consist of a combination of upper and lowercase letters, numbers, and symbols. Afterwards, you will be asked to save your ‘Secret Backup Phrase’. This is the recovery phrase I mentioned earlier in this article.
Click where it tells you to ‘reveal the secret words’ and write them down in the correct order. You can also save them to a USB drive in addition to that so you can just copy them easily the next time you need to recover it. Afterwards, it will ask you to enter or select the words from the recovery phrase in the correct order. Click the confirm button and you’re done!
Please be wary of the risk that malware poses to the wallets on your computer. Malware can steal the contents of your clipboard (like your recovery phrase or passwords), and it can log your keystrokes (keyloggers).
Ensure that your computer is free of malware and don’t go to any websites that may contain it. To be safe, it’s better to use a computer you don’t use for anything else (especially nothing online) to create this wallet. Also, if you have a Linux machine — it carries a relatively low malware risk.
How To Send Ethereum Tokens
Ethereum tokens can be sent to anyone in the world that has an Ethereum wallet. Ask the person to send you their Ethereum address and click the ‘Send’ button in MetaMask and paste their address in the ‘Add Recipients’ field.
If the MetaMask window isn’t showing, click the icon that looks like a fox in the top right hand corner of your browser window or the icon that looks like a puzzle piece, then select MetaMask.
You should see a dialog in which you set the amount of ETH you want to send, as well as the type of token and the gas fee. You can ignore the gas fee in most cases. The ‘Asset’ field should match whichever token you are sending. For simplicity, i’d start with ETH (which is the default).
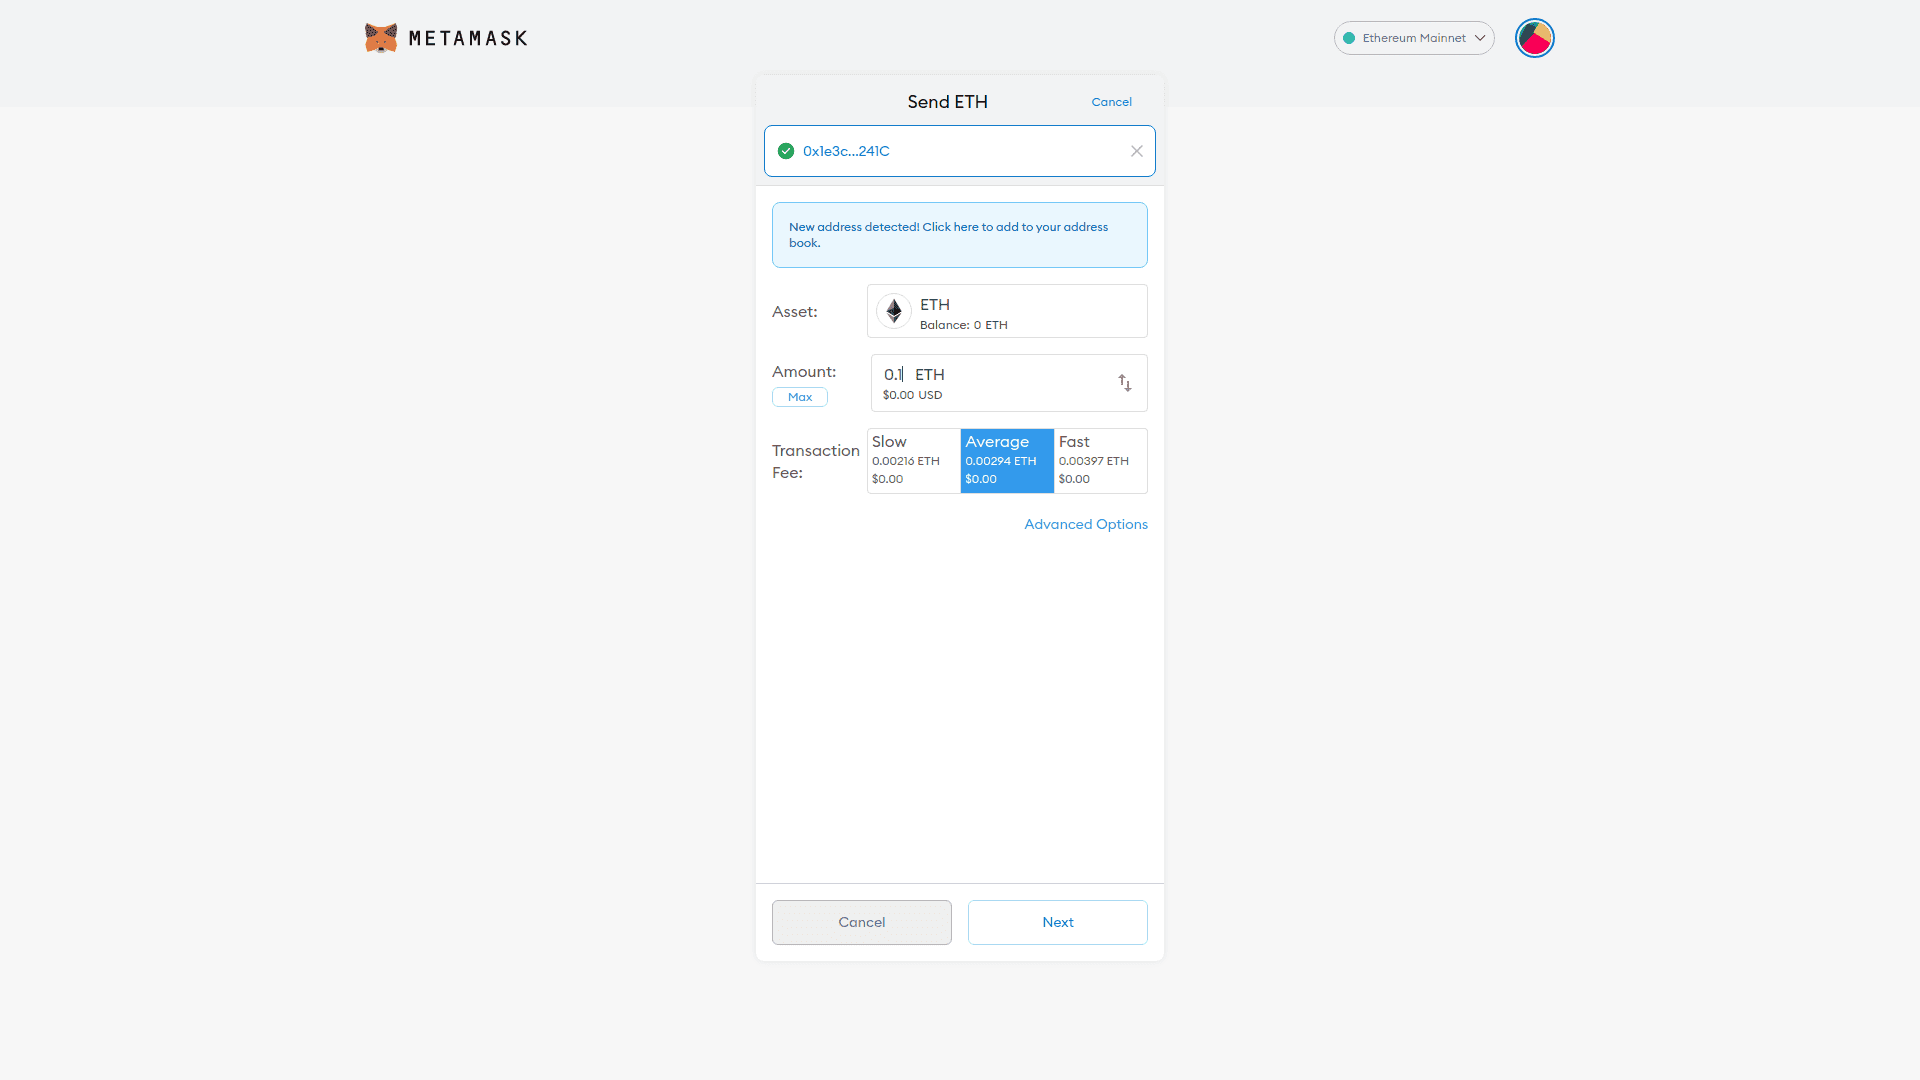
An Ethereum gas fee is charged at the time of the transaction to pay Ethereum’s miners for helping to secure and sustain the network. During times of great congestion, a higher gas fee may be needed to ensure that your transaction goes through. In most cases selecting the ‘Fast’ option will do if there is a little congestion.
In more extreme cases you may have to click ‘Advanced Options’ and manually type in the gas fee you want to pay. Please exercise caution when doing this and review the amount carefully. People have overpaid significantly for gas (thousands of dollars in some cases) due to simple typographic errors. After setting the amounts and clicking ‘Next’, you will see a dialog confirming the amount you’re sending and the gas fee. Review everything carefully and click ‘Confirm’ to send off the tokens.
How To Receive Ethereum Tokens
Your Ethereum wallet comes with an address that looks like a long string of numbers and letters that starts with ‘0x’. If someone wants to send you Ethereum, click ‘Account 1’ near the top of your MetaMask window. It should have copied the address to your clipboard. Look out for a small confirmation saying it has been copied. paste that address into whichever chat window you’re using and review the address to ensure it’s correct.
If you don’t know your address, click the three dots in the top right corner of the MetaMask window and then click ‘Account Details’. That will display your address in text format as well as the QR code. The QR code is for mobile wallet app users to scan your address instead of having to copy and paste it.
You can keep track of the transaction using an Ethereum block explorer. You can ask the sender to send you the transaction id (txid) or send you a link to the transaction on a block explorer. This is an easy way to prove that they sent the tokens to your address. You can paste the transaction id in a block explorer such as Etherscan.io to see if they’re telling the truth.
Over time, you will appreciate the transparency that Ethereum offers!
You can also store Ethereum tokens more securely on a hardware wallet such as a Ledger Nano or Trezor.
Also, read my article explaining how to create a Bitcoin wallet.
How To Create A Mobile Ethereum Wallet
I would not recommend creating a mobile Ethereum wallet due to the high risk of phone loss or theft (and a malware risk as well). However, if you really need to create one there are several options including but not limited to Trust Wallet, TokenPocket, MetaMask mobile, among many others.
To create an Ethereum wallet on your phone with Trust Wallet, install and load it, and the first screen should have a ‘Create a new wallet‘ button.
Tap that and proceed to the next screen on which it warns you to back it up in case your phone malfunctions or is lost. Tap Continue and it will display your recovery phrase (12 words in a certain order).
Write down the recovery phrase and store it somewhere safe, as the wallet provider cannot recover your wallet for you if you lose that phrase. Continue to the next screen where it asks you to enter the recovery phrase in the exact same order to ensure that you have written it down correctly. When done, click ‘Continue’.
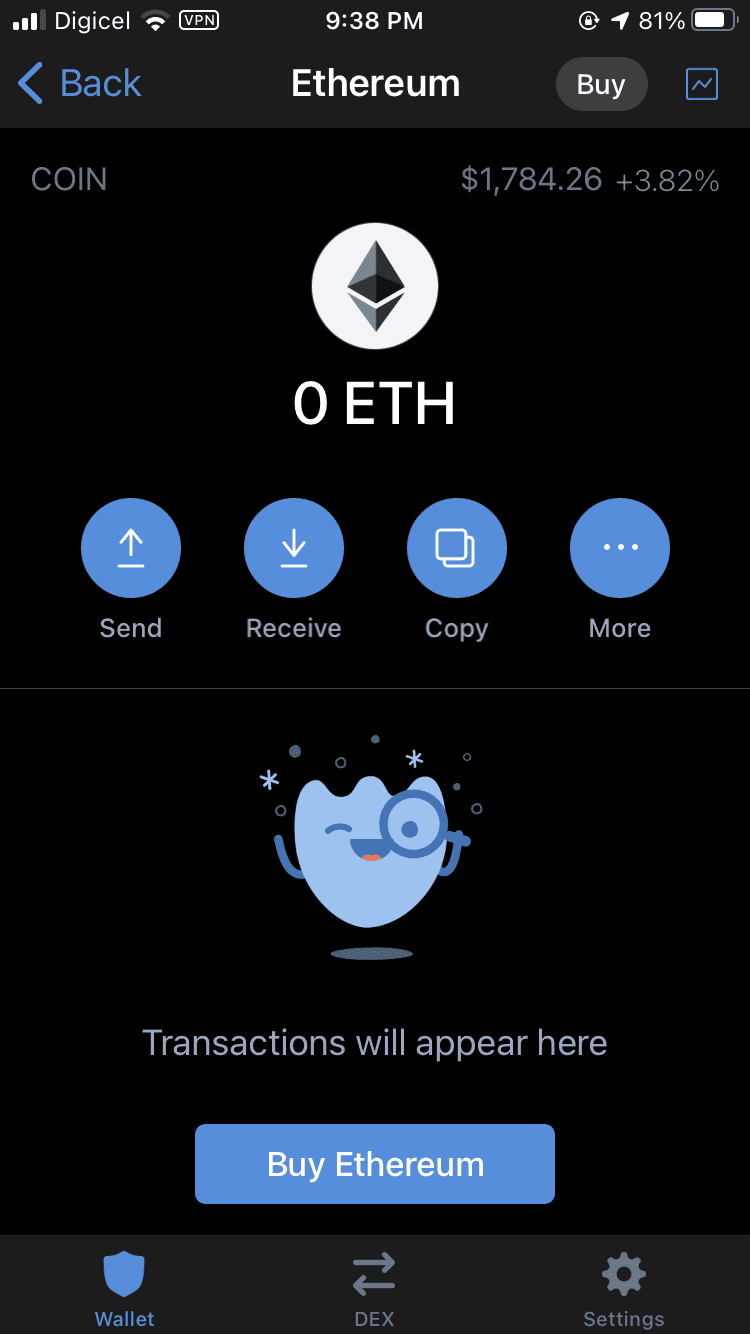
After clicking past the welcome screen, you should now see a list of wallets including Bitcoin, Ethereum, among others. Select Ethereum and you should see your Ethereum balance in ETH, as well as a ‘Send’, ‘Receive’, ‘Copy’ and ‘More’ button.
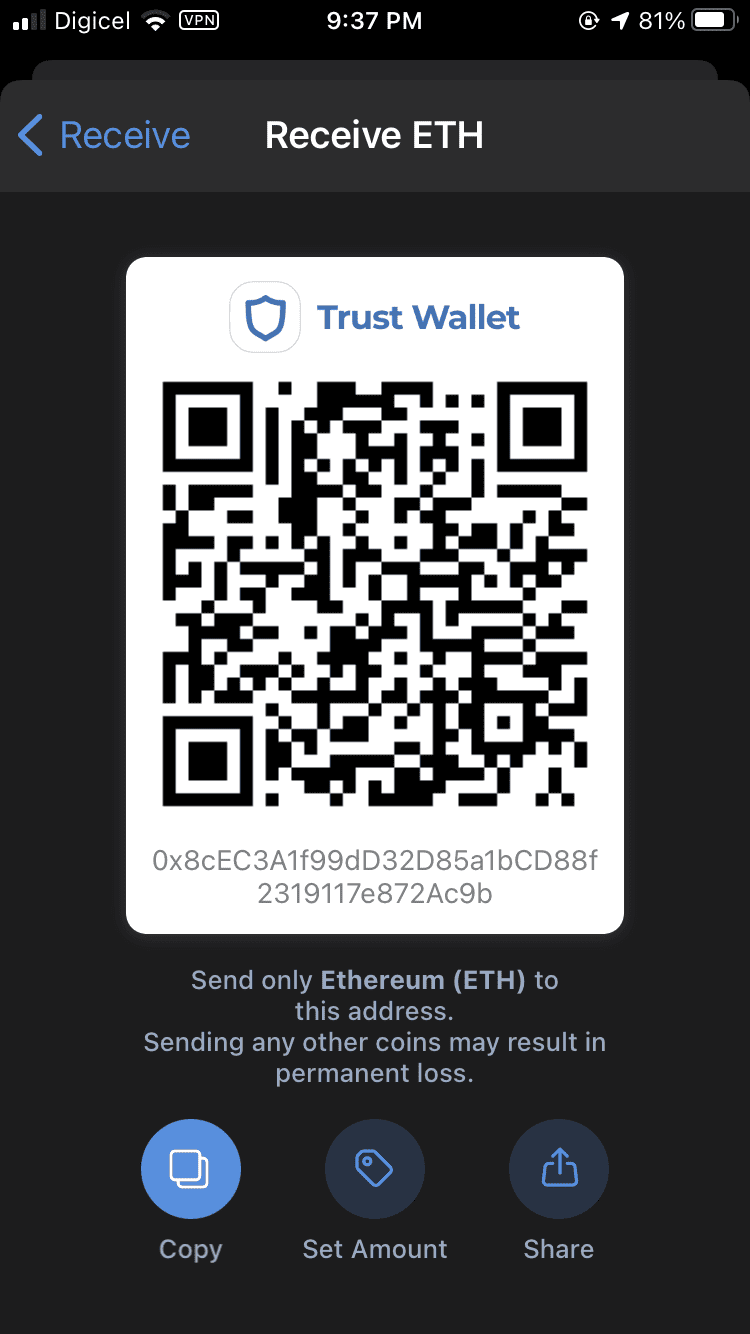
To receive ETH or ERC20 tokens, tap the ‘Receive’ button and your address should show up in two formats. One is a QR code that a sender with a phone can scan so that they don’t have to type or copy in your address, and the other is the text format that you would send to the person paying you.
After giving them your wallet address (not your private key!), you’d simply wait for the transaction to come in and close the app and check your balance later.
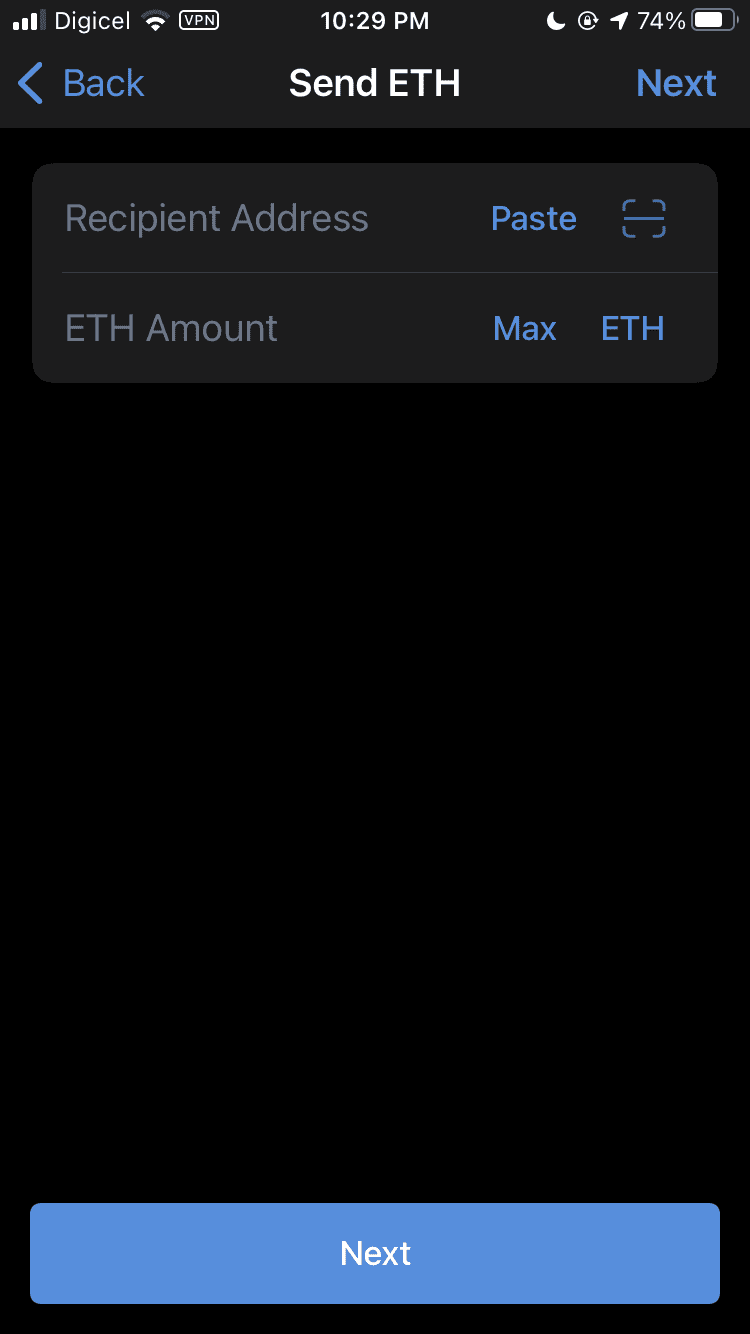
To send ETH, tap ‘Send’ and paste the recipient’s address in the ‘Recipient Address’ field, and the amount of ETH you’re sending in the ‘ETH Amount’ field.
Click Next and review the fees and amounts carefully, and follow the wizard until it tells you the transaction has been broadcasted/sent.