By Nicholas Brown – Follow me on Twitter.
This tutorial explains how to send a GET request from a Node.js app and save the data it receives from the server in a MongoDB database. Let’s say that we have a server in the United States, and want to quickly serve data to visitors in New Zealand. We would want to avoid the long, slow trip around the world and improve loading times.
That can be achieved by mirroring data. In this scenario, mirroring is just creating a copy of data where it is needed — The software equivalent of getting a towel for the bathroom downstairs, so you don’t have to run upstairs for it every time you shower. It’s faster!
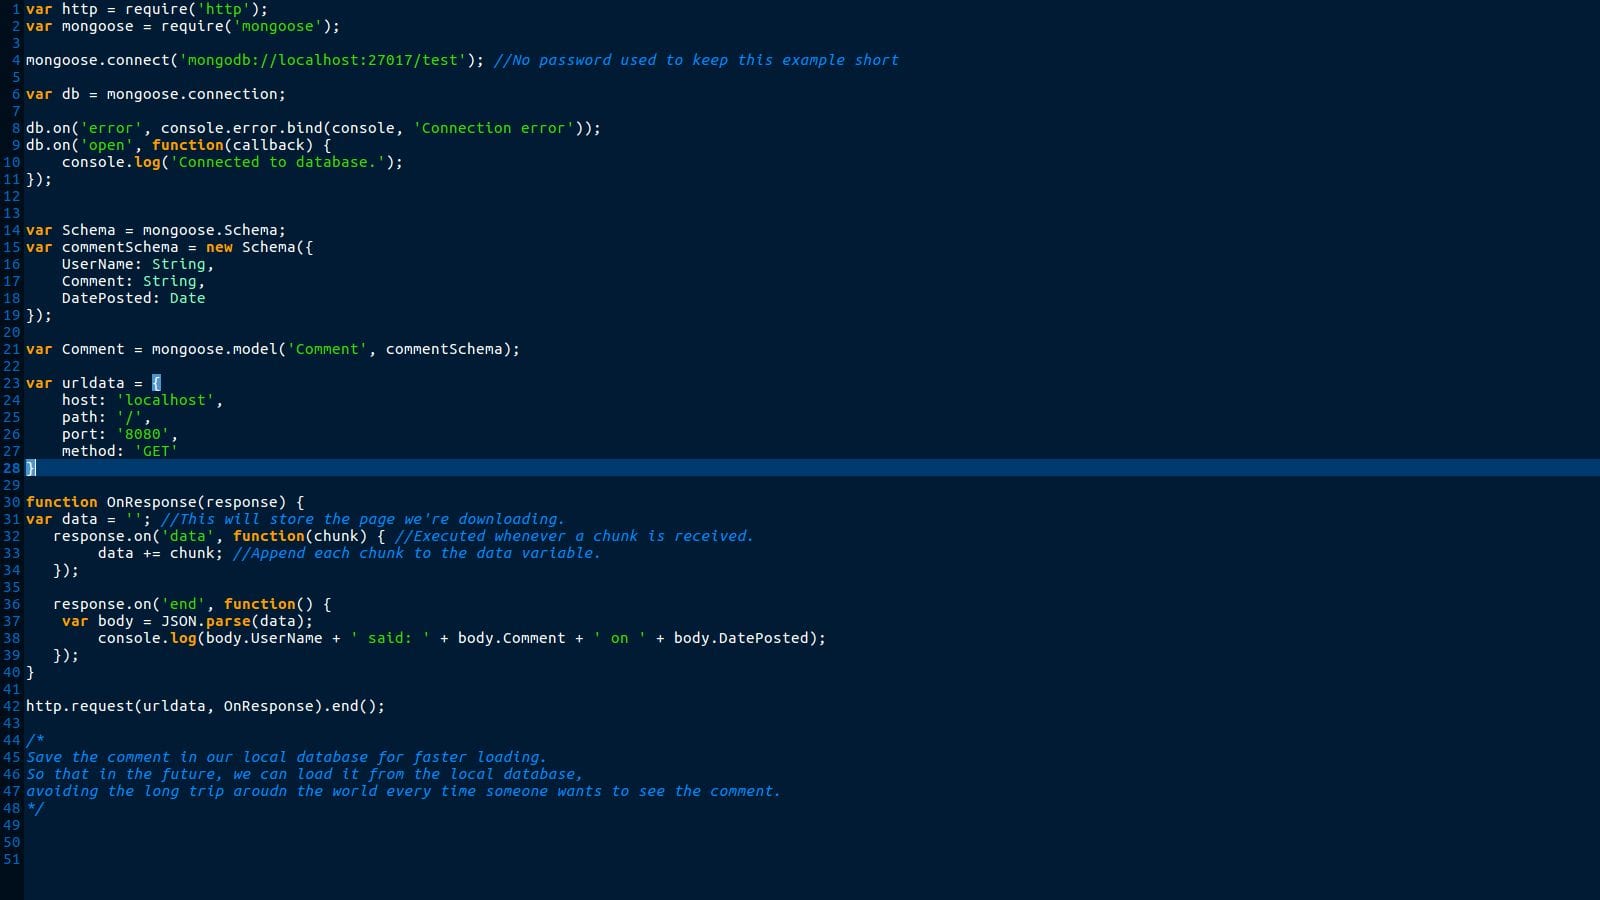
The following Node.js code sample uses the ‘http’ library to send a GET request to a server which you can run by downloading testapi.js below. Upon receiving the data requested, it saves it to a database named ‘test’.
Before proceeding:
– Install Mongoose, the library we will use to work with MongoDB. Do this by typing npm install mongoose in your project directory after installing Node.js.
– Set yourself up with a text editor such as Gedit, Atom, or Notepad++.
Replace line 4 with this if your Mongoose version is greater than 5.10:
mongoose.connect('mongodb://localhost:27017/test', {useNewUrlParser: true, useUnifiedTopology: true});
Line 1 and 2 import/include the necessary libraries for this project. You won’t have to install the Http library using NPM, Node.js does that for you during installation. Mongoose on the other hand has to be installed using the npm command shown above. ‘NPM’ means Node Package Manager.
It is a package manager that makes it very easy to install libraries from NPM repositories. By default, the ‘npm install’ commands save Node.js libraries to your project directory (specifically, the directory you were in when you typed the npm command).
Lines 4 to 11 connects the Node.js app to the MongoDB database hosted by the MongoDB database server, which is listening for connections on localhost, at port 27017. Please see our Mongoose guide for a more detailed explanation of how to data storage with Node.js and MongoDB works. It also explains a more modular approach which takes more time, but is worth it in the long run.
Lines 13 and 14: This is where we define our schema and data types, which is the structure of the documents being stored. We are simply declaring that the commenters’ usernames will be stored as strings (a string is known as a ‘data type’), and the comments will also be stored as strings. The same applies to ‘Date’, except the data type is called ‘Date’.
Line 20 declares the ‘Comment’ model, and that is is based on ‘commentSchema’, which was defined above. The ‘Comment’ model can now be used to create a JSON object that we’ll save to a MongoDB database. The name of the database our Node.js app will use is ‘test’.
Mongoose uses the ‘Comment’ name we provided to make a pluralized name for the collection called ‘comments’. It usually just converts your model name to lowercase and appends an ‘s’ to pluralize it. Once this has all been done, you can launch the Mongo client and find all of your saved comments by typing:
- mongo
- use test
- db.comments.find();
For a more detailed explanation of how GET requests in Node.js works, go back to that article.
Next: Apply your knowledge and use it to find businesses nearby using this simple code snippet.
Further reading: How to send a POST request from a Node.js app.
Code tested against the following:
- Node.js version 6.9.5.
- Mongoose version 4.10.4.
- MongoDB version 3.2.12.


