The Raspberry Pi is a simple single board computer (SBC) that you can use for basic web browsing, turning things on and off via software, and setting up home media centers. However, it isn’t exactly plug and play.
This article is specifically for the Raspberry Pi 3 B.
If you purchased a Raspberry Pi 3 B directly without a third-party kit, then you’ll need to purchase the following to get it up and running:
Optional: An AC adapter to power the Raspberry Pi (this enables you to plug the Raspberry Pi into a 120 Volt outlet). The Raspberry Pi can be powered by any 2.1A USB power source, therefore you can plug it into car chargers, solar chargers, and USB power banks as long as they can supply 2.1 amps.
Required: microSD card.
A microSD card is the Raspberry Pi’s equivalent of your hard drive. It stores all your files and the Raspberry Pi’s operating system. You may be able to get your Raspberry Pi 3 B+ working with an 8GB microSD card (especially if using DietPi), but 16GB or more is ideal. If you wouldn’t want your phone or computer to have only 8GB of disk space, the same applies to your Rasberry Pi.
You can get SD cards in this capacity range for very little on Amazon. Check if your laptop has an SD card reader, as you’ll need to write the bootloader image to the microSD card. If your laptop doesn’t have such a reader, you can buy one.
Recommended: A case.
The Raspberry Pi contains static-sensitive electronic parts such as ICs, it is highly recommended that you purchase your Pi with a case for protection. It is however, not needed if you are going to install the Raspberry Pi inside another device that already has a casing.
Optional (required for some applications): A fan.
The Raspberry Pi can get hot easily if it only has passive cooling (for example: if it has a heat sink, but no fan, then it is passively cooled). I found that the right combination of a heat sink and a fan can keep it at optimal temperatures even when subjected to a heavy workload.
It will be fine without a fan under light workloads. If you do want a fan, I recommend purchasing a Raspberry Pi case kit which comes with a heat sink and fan designed to fit in it. It will save you a lot of trouble.
There’s one by Miuzei. I have one like this and its beautiful, but it isn’t the easiest to assemble.
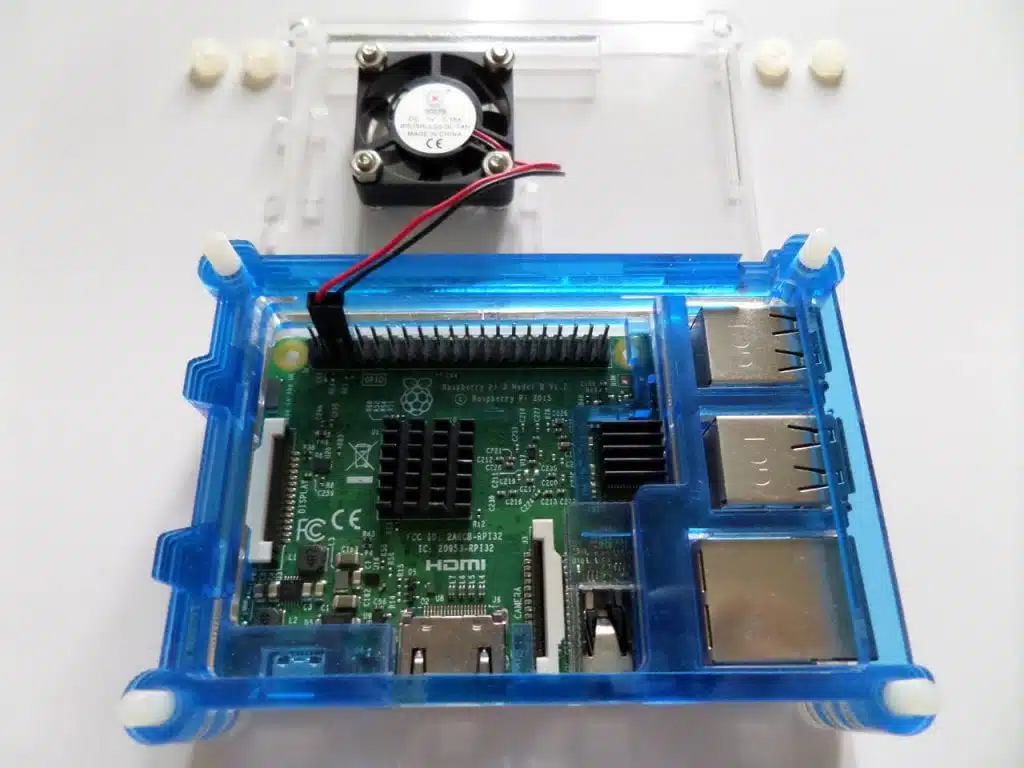
Image credit: Kompulsa.
Once you have obtained all the necessary items:
- Download the DietPi image (if this is the OS you want to use). DietPi is very light on resource usage. Raspbian is another popular OS option, and is the official Raspberry Pi OS. You can install it easily with NOOBS (discard the instructions below if you do).
- Then place the microSD card into an SD card reader/writer and run Etcher, an image writer.
- Etcher will prompt you to select an image to write. Select the DietPi image you just downloaded and be sure to select the microSD card as the medium to write it to.
- Click ‘Flash’.
- When you’re finished, insert the microSD card into the Raspberry Pi as shown below, plug in an HDMI monitor or TV, plug one of the recommended power sources into the USB port, and then your Pi into a USB power source (like that AC adapter I mentioned). The Raspberry Pi 3 B doesn’t have an off switch, so it will turn on straight away when you plug it in.

Image credit: Kompulsa.
If you’re interested in using the Raspberry Pi to switch things on and off, proceed to the official GPIO documentation.